Friday 10 November 2017

MISTAKES TO AVOID WHEN USING DRIP IRRIGATION KITS


 Drip irrigation systems are very user friendly, but the potential for costly mistakes is always a factor for the do-it-yourself installer. Here are five common mistakes and some tips on how to avoid them.

Mistake 1 – Over-Watering Your Plants. Probably the hardest adjustment when converting to drip irrigation is getting past the expectation to see a large wet spot on the ground or even puddling of water at the base of the plant, much like you see when watering by hand. Drip irrigation is a very efficient way to get water to your plant's root zone, so you don't need as much water as other watering methods. In fact, you should only see a small spot of water on the ground surface (about 3 diameter) at the dripper. The water gets to your plant's root zone by traveling vertically through the soil due to gravity and horizontally through the soil due to capillary action within the soil. To see exactly how water is permeating your soil, first run your system for 30 minutes, then shut it off. Wait another 30 minutes, then dig down below a dripper and around the plant to see the wetting area and if there are any dry spots. If necessary, you can either adjust the placement of your dripper or add another dripper. Sometimes it's best to start with a lower volume of water, monitor your plant's health frequently to see if it needs more or less water, and adjust the water volume or watering time accordingly.

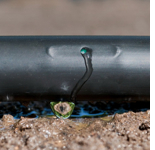
Mistake 2 – Not Matching Your Drippers to Your Plants' Watering Needs. Different types of plants have different watering needs. If you're watering different types of plants on the same zone, you'll need to make sure you're not giving too much water to some plants and not enough water to other plants. Ideally, you would want plants with different watering needs on separate zones. When that's not feasible, you can adjust your system accordingly. For example, if you have two plants on a zone, and one plant needs twice as much water as the other, you can put a dripper with double the flow rate at the plant that needs more water. If you only have drippers with the same flow rate, you can put multiple drippers at the plant that needs more water to double the flow rate. Side note: Space your drippers at least 6 inches away from the base of established plants to avoid fungal infections and other types of diseases. Try using two drippers per plant positioned at opposite sides of the plant to promote even root growth, and if one dripper gets clogged, the plant will still receive water from the other dripper. See our complete selection of drippers. 


Mistake 3 – Exceeding the Tubing Capacity of Your System. This mistake occurs commonly when you are not aware of the system's capacity. For example, the capacity for 1/2 poly tubing is 200 feet (single run length) and 200 g/hour (flow rate). If you have a 1/2 tubing single run length of over 200 feet, you may have inconsistent water flow at your drip emitters due such factors as friction between the tubing walls and the water flow. If you are using drip emitters with flow rates exceeding 200 gallons per hour with 1/2 tubing, you'll also get inconsistent results. This concept is referred to as the 200/200 Rule for 1/2 tubing. For 3/4 tubing, use the 480/480 Rule, and for 1/4 tubing, use the 30/30 Rule. Of course, there are always exceptions. For example, if you have a run length of 300 feet of 1/2 tubing and you have drippers on that line with a total flow rate of only 50 g/hour, the low flow requirement will usually offset the friction loss in the longer run lengths.  Dripsol Company, Installation has lots of good basic information to Farmers to help keep their project on track.

Mistake 4 – Inadequate Water Supply or Flow Rate. The flow rate (usually measured in gallons per hour or gph) from your water supply must be equal to or more than the flow rate required by your drip irrigation system. For example, if you are using 200 drip emitters rated at 1 gph each on 1/2 tubing, that equates to a total of 200 gph required by your system. Although you are within the tubing capacity, if your water supply is not producing at least 200 gallons per hour, you will experience inconsistent water flow from your drippers. For this example, you can either decrease the required flow rate of your system by decreasing the number of emitters, or you can use drippers with a lower flow rating, or you can split your system into more than one zone. We have an easy flow rate calculator ; To calculate the flow rate of your particular water source, fill a bucket with the water source fully open. Time how long it takes to fill the bucket to the top. Then, enter your figures into the calculator. The results will tell you how much water is flowing out of your source over a period of time, and the maximum size drip irrigation system that your water source can service.

Mistake 5 – Water Supply Pressure is Too High or Too Low. Where we see the low pressure issues are mainly with wells and water tanks. If you have concerns that your pressure is too low to properly support a standard drip irrigation system, you can always consider a system specifically designed for low pressure water supply applications, like rain water catchment or other containment systems. 

Many of these mistakes can be avoided by spending a little bit of time planning your system. Let's know what's making your drip irrigation to fail.Write to us; info@dripsol.com or  sales@dripsol.com  to place an order of our drip system at an affordable price or call us through 0746300055

Wednesday 8 November 2017


Drip Irrigation Emitters Difference?

Drip Irrigation users can select from a number of different types of drippers to suit different watering needs. Drippers, also referred to as emitters, are the end devices which deliver water to plants in a specific manner. By understanding the differences in emitter types, users can more easily select the right emitter for any application.

In a typical drip irrigation system, tubing is laid out from the water source to the end of the planting area. This mainline tubing may have emitters attached directly to it at points adjacent to individual plants. Smaller tubing can also be installed between the mainline tubing and individual plants with emitters attached to the ends of the smaller tubing. Emitters might also be imbedded within certain sizes of tubing, called drip tubing or drip tape, with the emitters spaced at specific distances apart within the tubing. Since systems can be configured in many ways, it is not uncommon to find any combination of different types of emitters within a system.

The most common emitter is known as a dripper or button dripper, and emits water at a specific rate, Drippers are commonly used to water individual plants, and most drippers are color-coded so the user can easily identify the different flow rates. Cleanable drippers have a removable cap to allow the user to remove small obstructions within the dripper. A dripper that is not cleanable would need to be replaced if it becomes clogged. Pressure compensating drippers deliver a precise amount of water regardless of changes in pressure due to long tubing runs or changes in terrain elevations. Adjustable drippers allow the user to vary the amount of water emitted, usually between 0 and 20 gph, by turning the dripper cap or a small valve.

Drippers are available with varying patterns with which water exits the dripper. Typical drippers just drip water from the end. Some adjustable drippers emit water in several small individual streams out to a diameter from a few inches to a few feet in arcs of 360 degrees or 180 degrees. A bubbler type of dripper produces a gentle umbrella pattern for rapid watering near the root zone. A "vortex" type of dripper emits water in a steady circular pattern for a larger coverage area than a bubbler. The inlet side of drippers is usually a barbed end designed to be connected to 1/4 tubing or inserted into a hole in the side of larger diameter tubing. Emitters with threaded ends are available to allow some types of drippers to be inserted into rigid 1/4 risers or into a hole drilled into PVC tubing. Some drippers even come with a built-in stake to secure it into the ground. Adjustable (stream), bubbler, and vortex drippers can be used for plants which require a larger wetting area than standard drippers can provide, such as plants with wide root zones or plants in larger containers

.
Spray Jet emitters spray water out to a larger diameter than typical drippers in arcs of 90, 180 or 360 degrees, and the flow rate is usually adjustable. Another type of spray jet, called a strip jet, sprays water in two opposite directions for watering narrow strips of area. Another type, called a downspray, sprays water in a downward circular pattern. A pop-up spray jet consist of a narrow tube which rises from a larger tube when activated, which is similar to the pop-up sprinklers used in high pressure landscape watering systems. Spray jets are most commonly used to water a large area such as crawling ground cover.


Micro sprinklers are emitters which spray water out to larger diameters than typical drippers or spray jets. While the spray pattern is usually 360 degrees, at least one type is available with an adjustable arc between 30 and 330 degrees. Micro sprinklers can be used to water areas such as smaller patches of lawn. Misters and foggers are emitters which spray water in a very fine mist. Some misters can also be used for air cooling effects as well as for watering plants.

Since drip tubing and drip tape have embedded emitters at specific distances apart, they are ideal for row plantings. Although drip tape needs to be laid out in straight rows, drip tubing can be laid out in curves or circular patterns as well, which is ideal in creating rings at the base of trees for efficient watering. Different types of available drip emitters means more design options for users. By matching the right emitters for your varied watering needs, you'll be able to maximize the efficiency of your drip irrigation system.


Monday 6 November 2017

  Troubleshooting Drip Irrigation With Dripsol Company.


No drip irrigation system is immune to malfunctions due to normal wear and tear or exceeding the systems limitations. Although your drip irrigation system is virtually worry free, you also need to periodically check all the components to insure that any problems or potential problems are identified and corrected in a timely manner. Here are a few solutions to help you maintain an efficiently operating drip kit system when certain issues arise:

Problem: valve does not open or close.

Solution: Check rubber o-rings and replace as needed. Re-tighten connections by hand only. Check for and clear any debris in the timer. Check the battery and replace if necessary.


Problem: Uneven or no flow at drippers; clogged drippers.

Solution: Check all filters and clean as needed. Make sure that you did not exceed the system's total maximum flow capacity of 30 gph for 1/4 tubing, 200 gph for 1/2 tubing or 480 gph for 3/4 tubing. Make sure that you did not exceed the system's total run length limitations of 30 feet for 1/4 tubing, 200 feet for 1/2 tubing or 480 feet for 3/4 tubing. Check for adequate water flow and water pressure available at the water source. Clean or replace pressure regulator if needed. While the water is on, hold your finger over the dripper outlet for a few seconds. This "back flushing" will often work to reset inconsistent emitters. Clean dripper (cleanable models) and/or replace dripper if necessary.


Problem: Drippers or fittings popping out of tubing.

Solution: Check water pressure past pressure regulator at the end of the mainline tubing run by unscrewing the end cap and attaching a pressure gauge onto the fitting. Recommended pressure is 25 psi. Replace pressure regulator if necessary. Check for and remove any clogs in drippers or fittings. Remove dripper if necessary, plug hole with a goof plug, then reinstall dripper into a cleanly punched hole in the tubing. If dripper is at the end of 1/4 tubing, remove dripper, make a clean cut at the end of the tubing, and reinstall dripper at the end.


Problem: Leaks along tubing; damaged tubing.

Solution: Cut out leaking or damaged section and reattach sections of tubing with a coupler. If tubing damage is caused by rodents, consider additional solutions to repel rodents.


Problem: Fitting separating from tubing; fittings do not fit tubing.

Solution: Push tubing further into or onto compression or barbed fitting. Ensure other types of fittings  are properly attached and secured. Ensure outside diameter (OD) and inside diameter (ID) tubing size is compatible with fitting size.


Problem: Plants appear stressed.

Solution: Check water flow at drippers near plants. Clean, repair or replace all associated components, including tubing and connectors as needed. Adjust dripper flow rates and add more drippers if needed. Adjust watering schedule as needed.


This troubleshooting guide is just a small sample of the issues which may occasionally arise with your system, so make sure to consult drip irrigation experts for more extensive or complicated problem solving services.


Happy Farming!

Post

Why is diversity so important in the battle with herbicide resistance?

Everyone would like the answers to farming’s problems to be simple, but the fact is, all over-simplistic solutions are prone to coll...